What is a Gate Qualifying Question?
By implementing a gate qualifier, you can create a block of “gated questions” that are accessible only to participants who meet the criteria established by a gate-qualifying question.
For example, your gate question could be‚ "Are you a sales representative with the company?" - if the response is yes, the participant will continue with that portion of the survey. If the response is no, the participant will seamlessly "jump over" the block of related questions.
This is a two-part question sequence in which you build the Gate Qualifier question and then the Jump Sequence questions.
Adding a Gate Qualifier Question
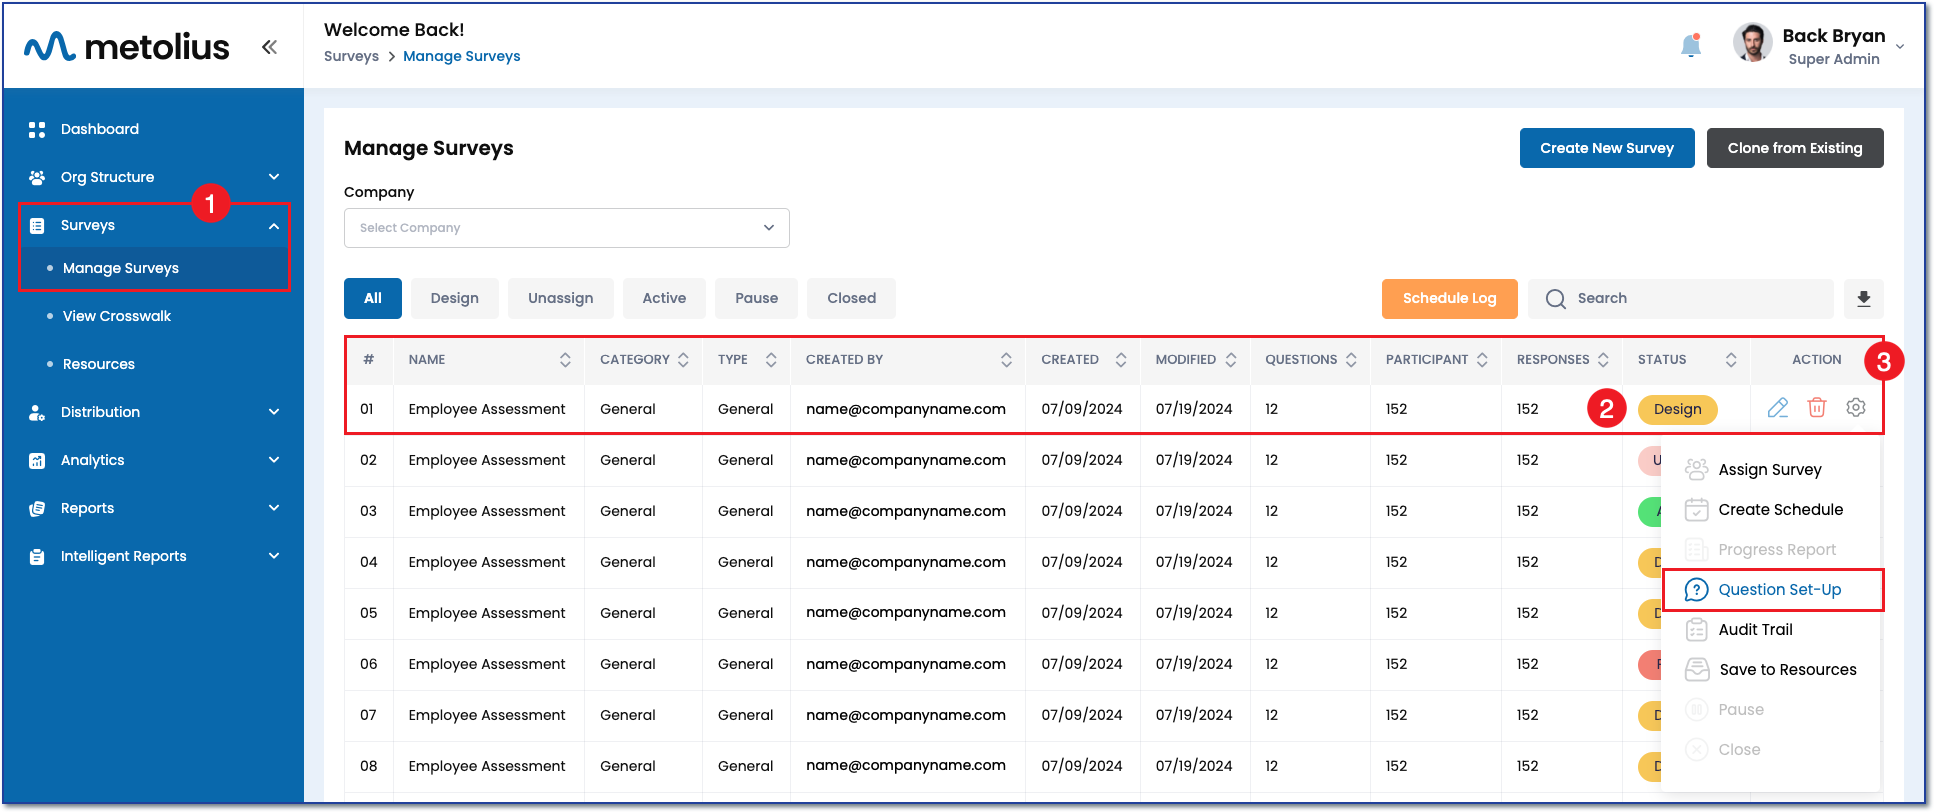
- Start by expanding the Survey menu on the left side navigation and click on Manage Surveys.
- Find the survey you wish to edit on the Manage Surveys page, it should be in the Design Status.
- In the Action column, click the gear icon inline with the survey you wish to edit. Choose Question Set-Up.

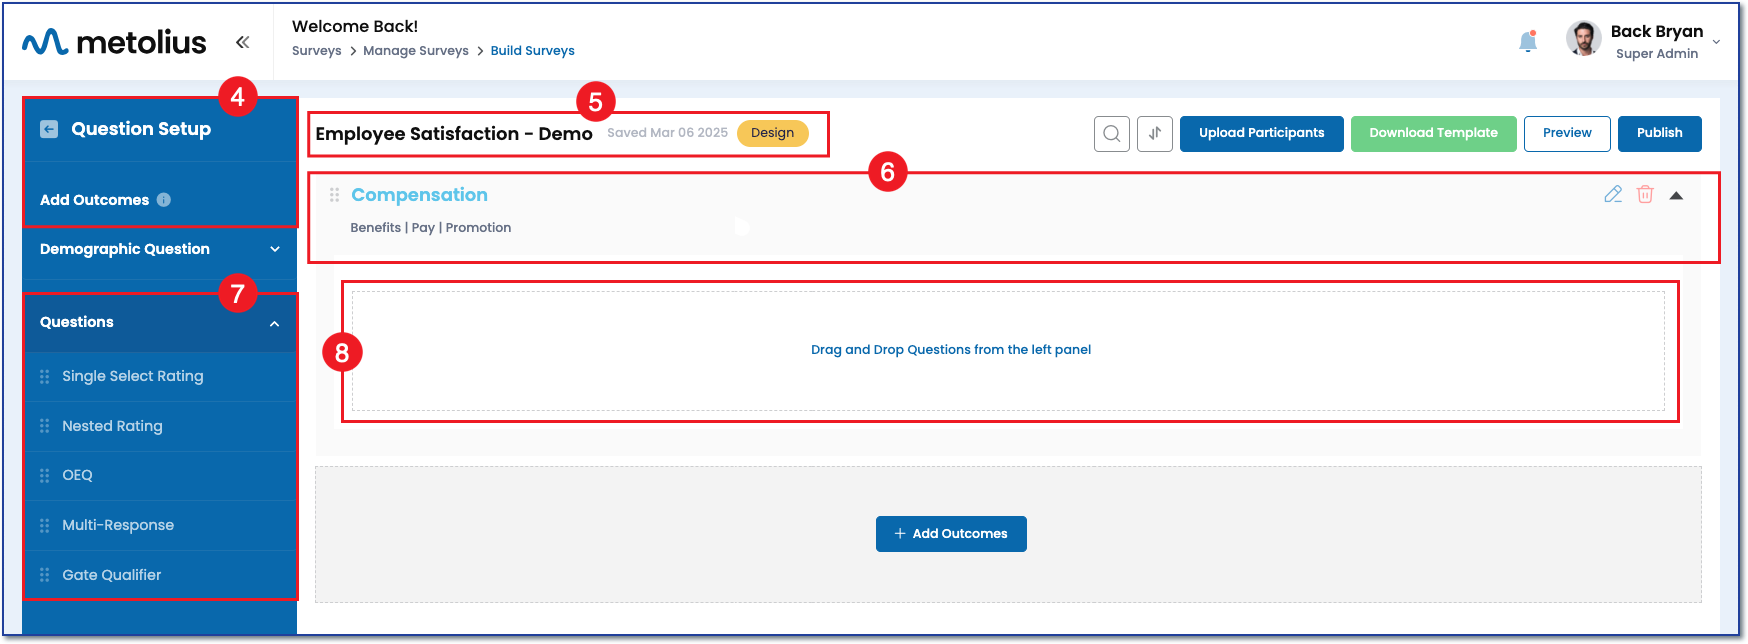
- Now you are on the Question Setup page.
NOTE: Questions can only be added within an Outcome. Therefore you must have at least one Outcome before adding any question types. To add an Outcome click the Add Outcome button. Give the outcome a name and a description. See this article for a detailed explanation of Outcomes.
See the following articles for more information on outcomes and survey structure:
- The survey name, it's last saved timestamp, and the status it is in are listed at the top of the page.
- Below the survey name is the Outcome in which you add questions. On the far right, click on the downward facing arrow to expand the outcome.
- Click the Questions menu in the left side navigation. Underneath this menu, find the Gate Qualifier question.
- Click and drag the question into the expanded Outcome where it reads "Drag and Drop Questions from the left panel."

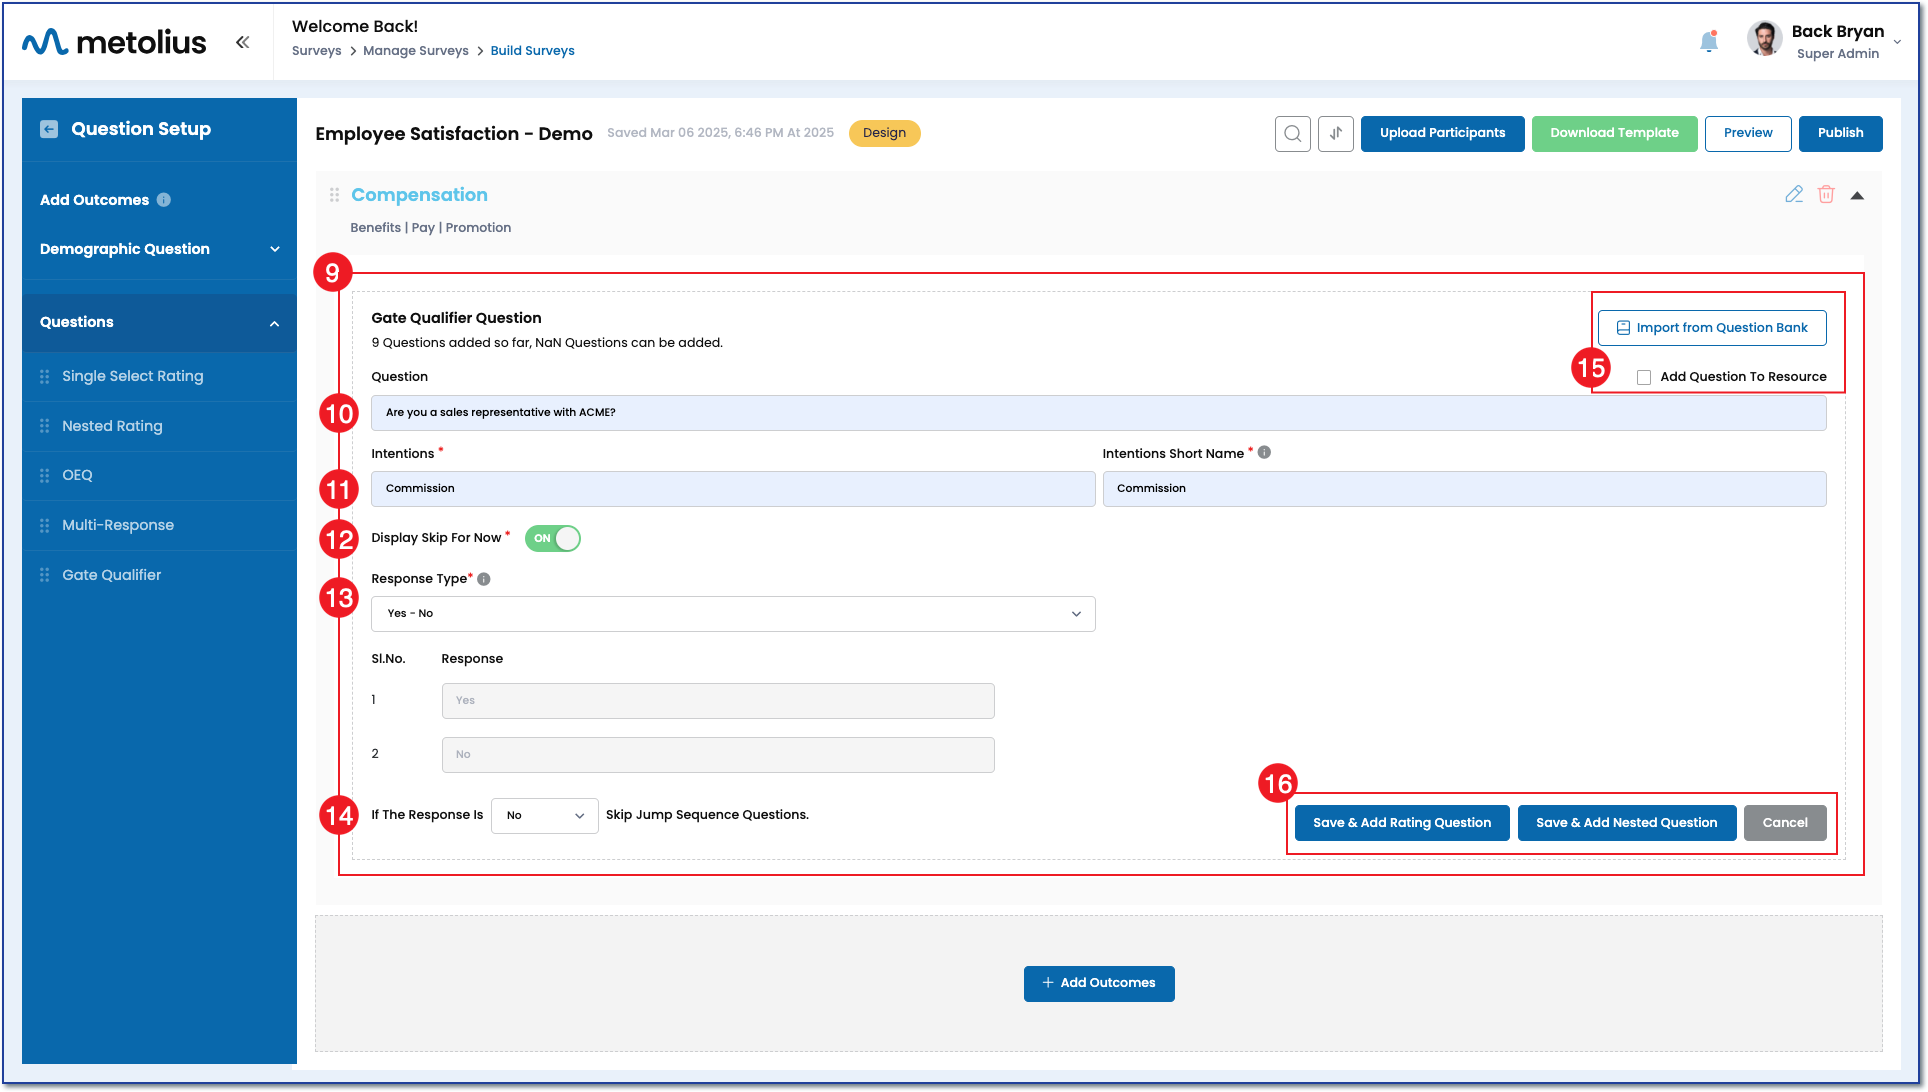
- Once dropped into the Outcome, the question expands into edit mode.
- Enter your question in the question text box.
- Enter an Intention and Intention Short Name in the provided text boxes.
See the following articles for more information: - Choose to display "Skip for Now" to your survey participants.
- NOTE: Skipping questions is only an option for surveys assigned to known participants. These types of participants are provided an account that their survey responses are saved to. This allows them to start, stop and complete a survey on their timeline versus all at once.
- See this article to learn more about survey assignment options.
- Choose a Response Type for the Gate Qualifier. Notice that all response options are binary, meaning participants can only choose between two possible answers. This design ensures that the selected response will either grant or deny access to the subsequent jump sequence questions.
- Next, choose the response that will close the gate and SKIP the jump sequence question set by selecting that option from the dropdown within the question If The Response Is {Select Response} Skip Jump Sequence Questions. Using our example question, "Are you a sales representative with the company?" - if the response is No, the participant will seamlessly "jump over" the block of questions you set up next.
- Choose to add your question to your Resources to use later in another survey by checking the radio button next to Add Question To ' Resource'. Alternatively, you can explore the Question Bank to import a pre-written question.
- Save the Gate Qualifier question and either add a single-select rating question, a nested question, or cancel building the question all together.

Building the Jump Sequence Question Set
The next step is to build the jump sequence question set that will be seen by the participants that answer the gate qualifier question accordingly. There are two question types you can add, a rating question or a nested question, you can use one or both to collect all the information you need.
Adding a Rating Question
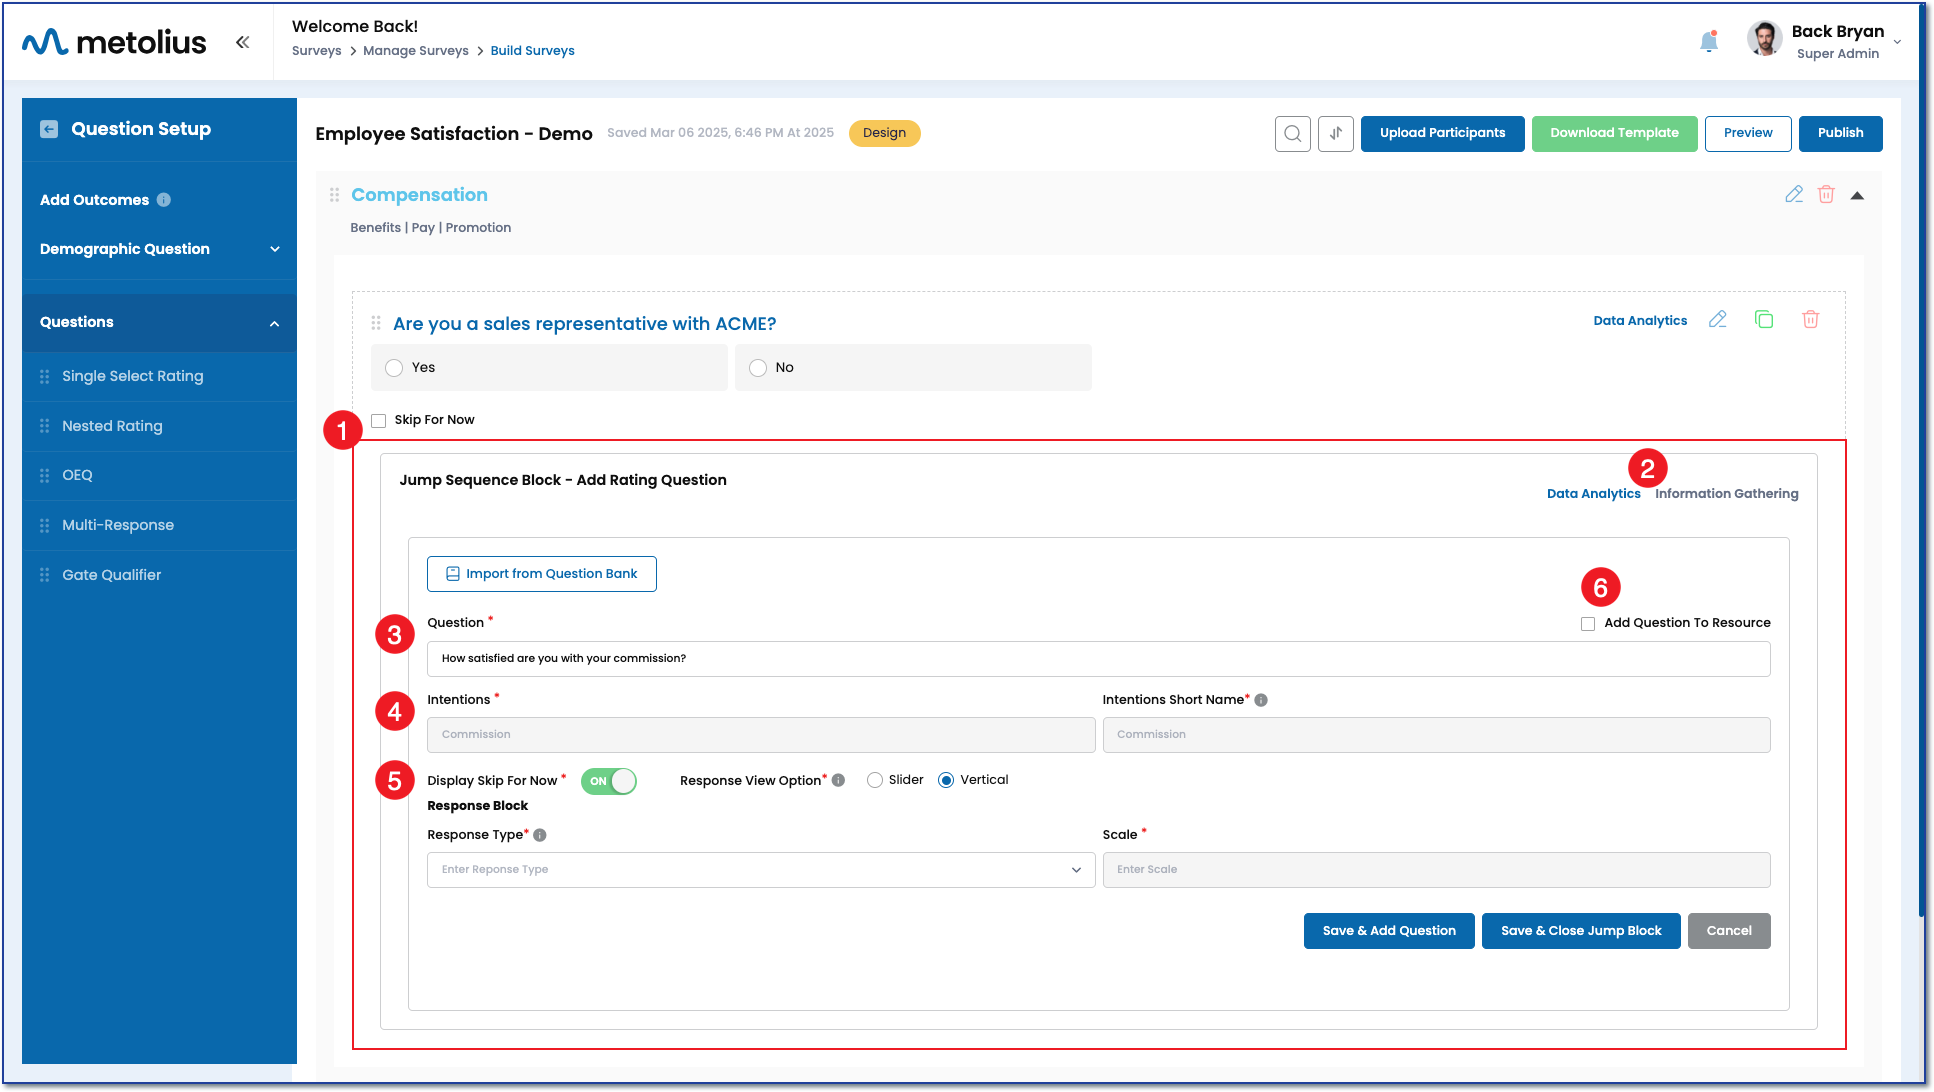
- Choosing "Save and Add Rating Question" will bring up a rating question in edit mode.
- First choose whether your question will be in the form of Data Analytics or Information Gathering.
- Data Analytics questions will have a numerical value associated to the response options and be added up when chosen by your participant to create a survey score.
- Information Gathering will only record the selected response and show the percentage and number of people that selected that response, numbers and scoring are NOT associated with information gathering questions types. See this article for more detailed information.
- For more detailed information review What's the Difference Between Analytic and Information Gathering Questions.
- Enter your question in the question text box.
- The Intention and Intention Short Name will be grayed out as the jump sequence question set is linked to the intention you chose for the gate qualifier question. See this article for a detailed explanation of Intentions.
- Participant View Options:
- Choose to display "Skip for Now" to your survey participants.
- NOTE: Skipping questions is only an option for surveys assigned to known participants. These types of participants are provided an account that their survey responses are saved to. This allows them to start, stop and complete a survey on their timeline versus all at once.
- See this article to learn more about survey assignment options.
- Choose Response View Option to display your response options as a horizontal slider or vertical radio buttons.
- Choose to display "Skip for Now" to your survey participants.
- Choose to add your question to your Resources to use later in another survey by checking the radio button next to Add Question To ' Resource'. Alternatively, you can explore the Question Bank to import a pre-written question.

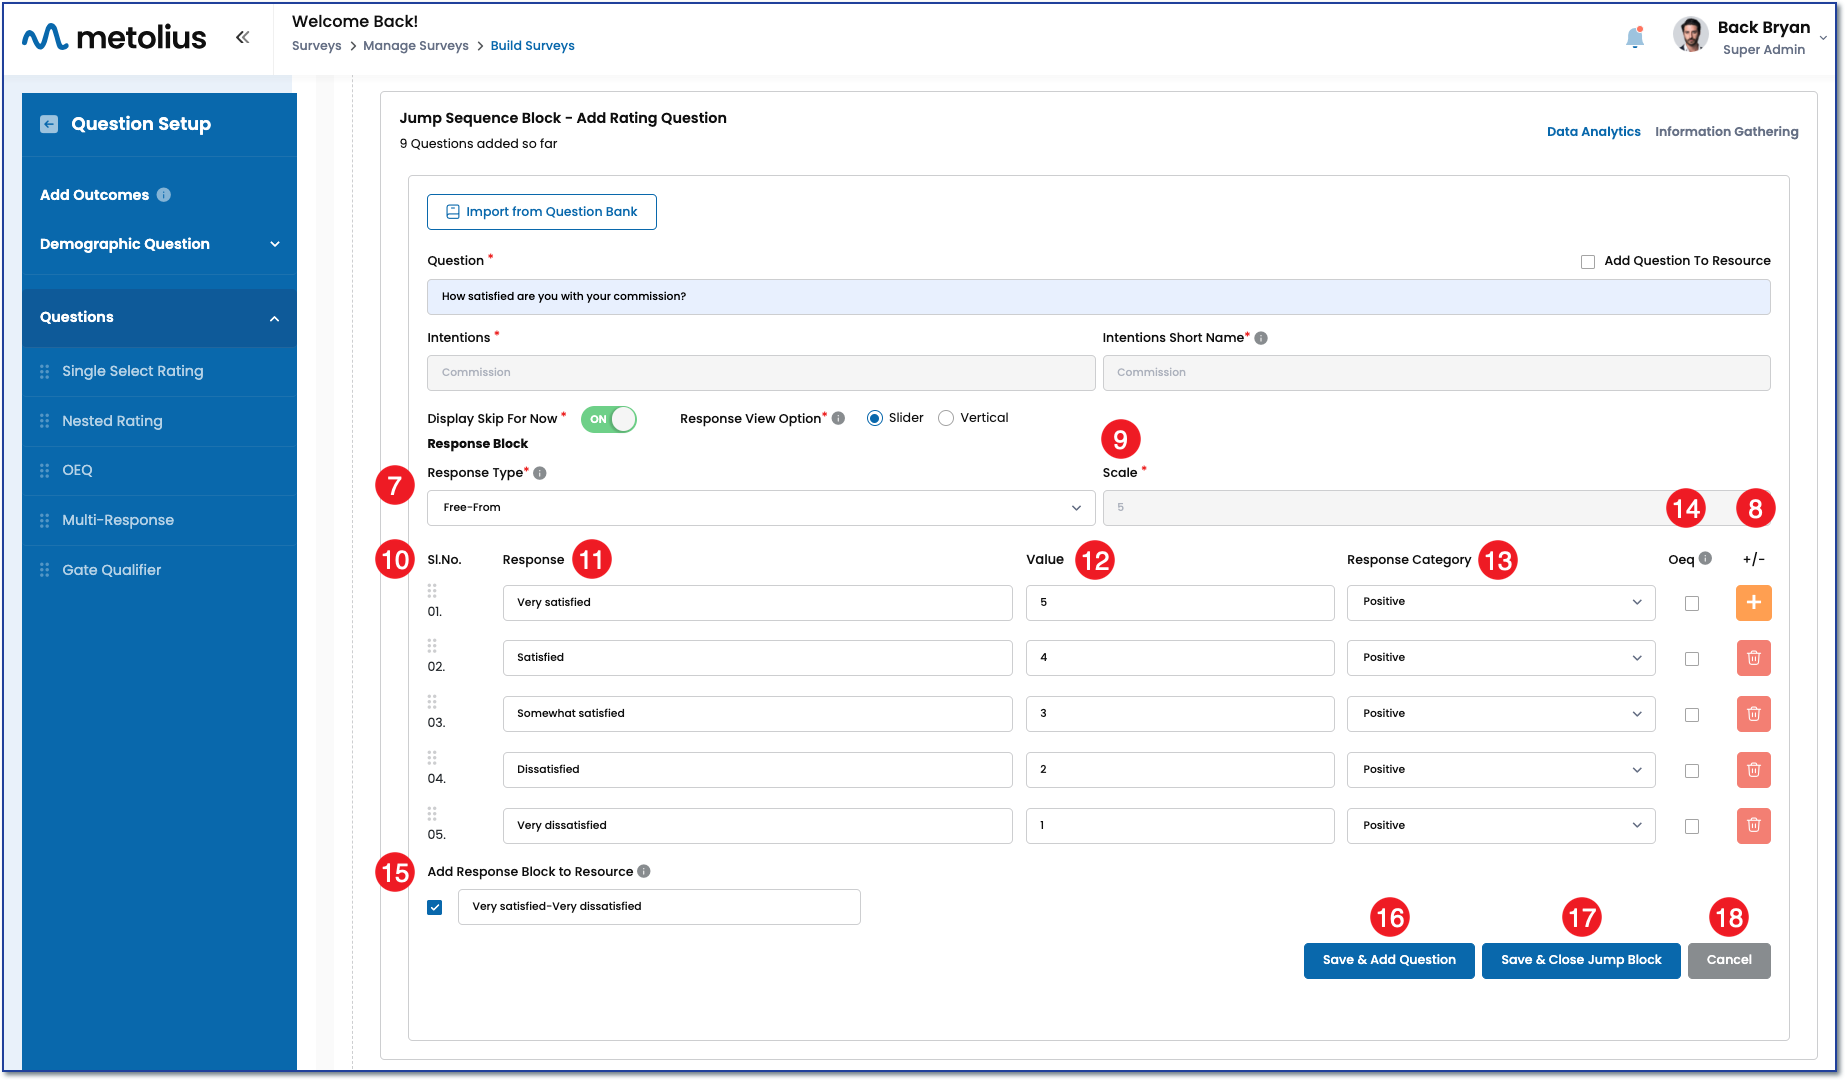
- Within the Response Block, click on the Response Type dropdown menu to choose a pre-existing response option set, or choose Free Form to create your own.
NOTE: When you choose a pre-existing response option set, all fields within the Response block will be filled in accordingly. If this is your choice, skip to #14 below. - When choosing Free Form, add the number of response options to your set by clicking the orange button with the plus icon. Alternatively, use the red button with the trash can icon to remove a response option.
- The scale will automatically adjust based on the number of response options you add.
- When you add your response options the sequence number to their left will automatically generate. If you change your mind about the order after creating them, you can drag and drop the order of the response options using the 6 gray dots to the left.
- Type in your response terminology into the Response text boxes.
- The numerical value, or weightage, associated to that response option will also auto-populate based on the Response Score Range you chose when setting up your survey attributes.
- Read more about understanding how to score a survey
- Read more on how to configure the survey settings.
- Choose a response category for each response.
- Read more on understanding the different response categories.
- In short, the response category determines whether the weightage will be added to or subtracted from the overall score when a participant chooses that option.
- NOTE: Most surveys use a POSITIVE response category for all responses, despite the sentiment of the response (agree versus disagree, for example), and give the favorable sentiments a higher score than the lower sentiments.
- To add a response-based open-ended question, check the OEQ box next to a response to have an open-ended question be presented to the participant when they select that response. After the box populates below the response of choice (In this example, response #5 "Not at all Satisfied"), add the open-ended question you wish to ask the participant.
- Check the box next to 'Add Response Block to Resource' and the entire response block will be saved to your Resources for quick setup in another survey later.
- Click Save & Add Question to save your question as part of the Jump Sequence block and proceed to add another rating question.
- Click Save & Close Jump Block to save your question as part of the Jump Sequence block and finalize it with this as the last question.
- Click Cancel to stop the question building process all together.
Adding a Nested Question
Choosing "Save and Add Nested Question" will bring up a nested question in edit mode.
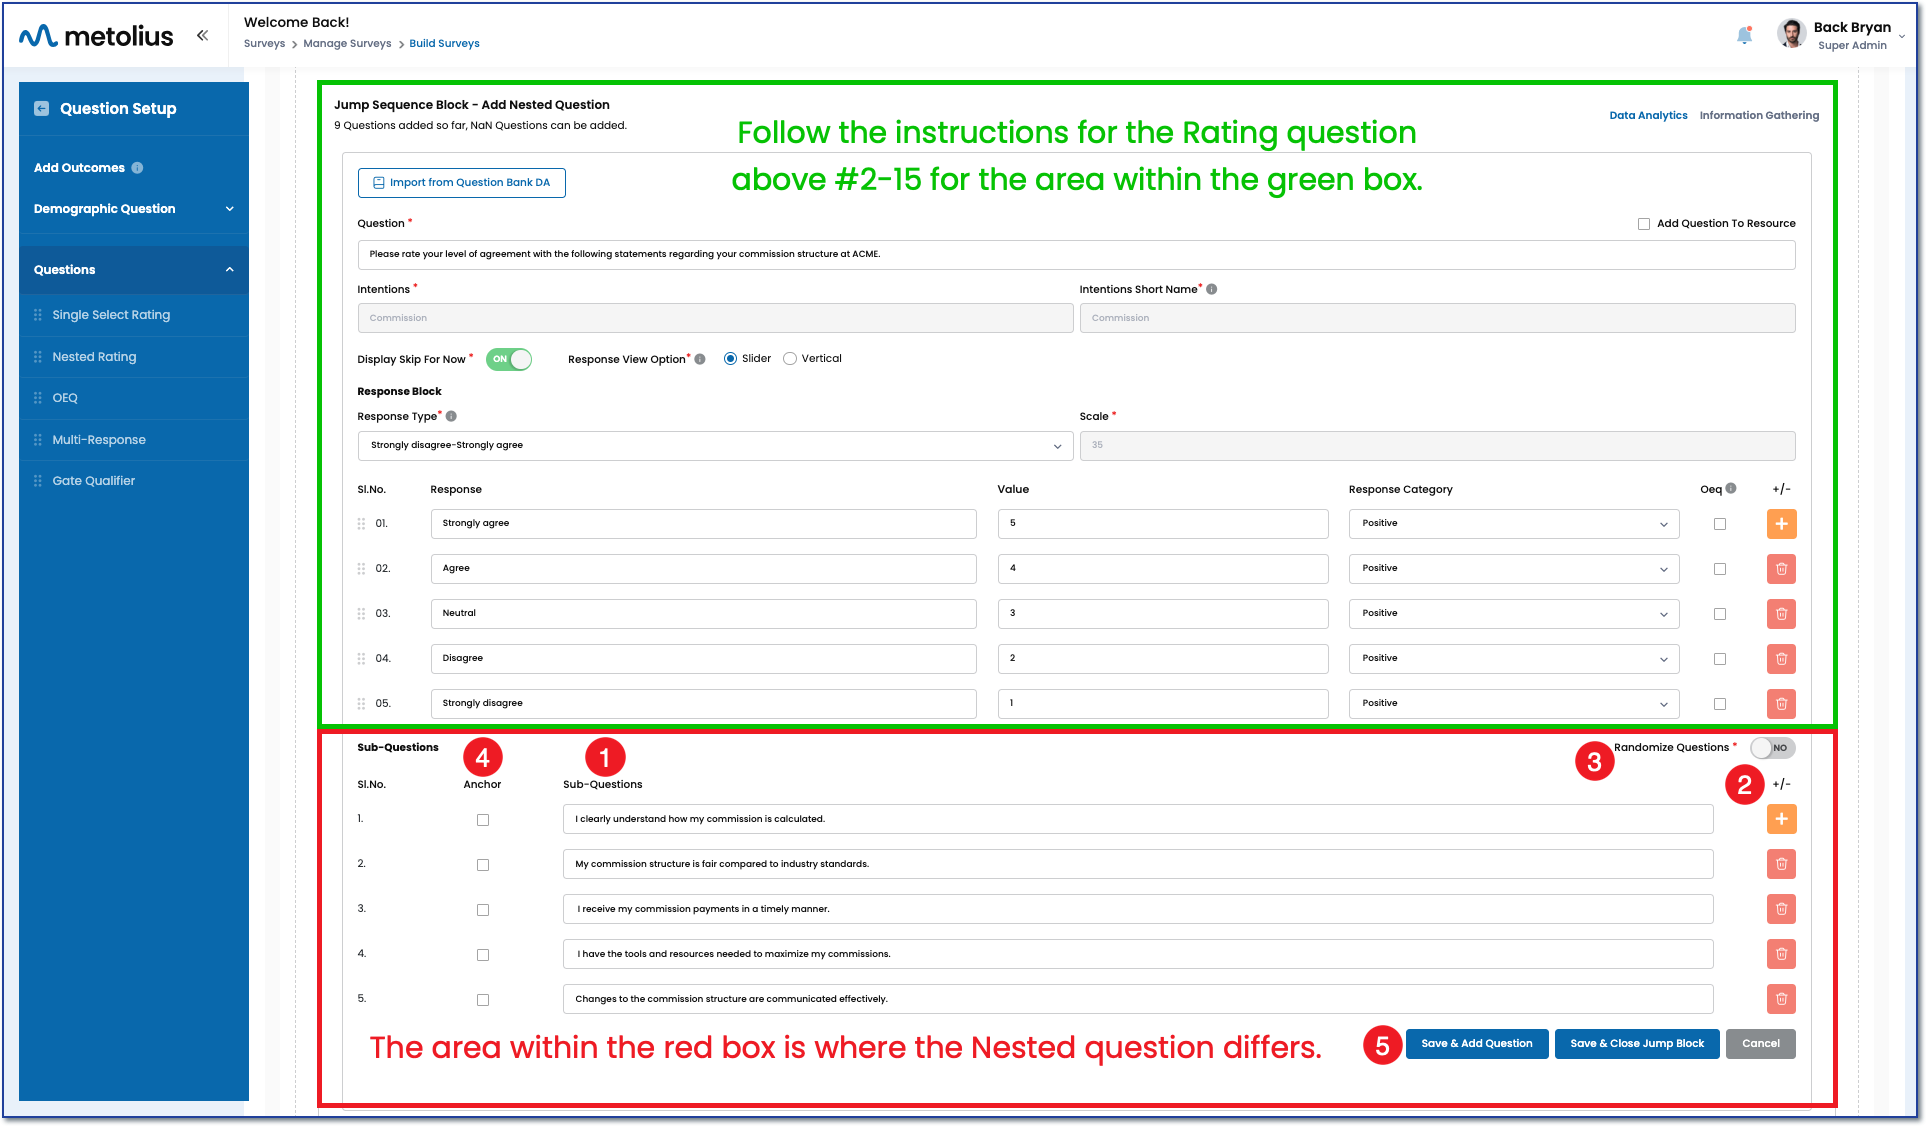
Because the rating and nested questions are the same up to a point, follow the instructions above for the rating question #2-15 for the area housed within the green box in the image below. The instructions below will pick up where the nested question is different. This begins with the sub-questions.
- Add your question text to the sub-question text boxes.
- Increase the number of sub-questions by clicking the orange button with the plus sign. Alternatively, delete them by clicking the red button with the trash can icon.
- Choose to randomize the order in which the sub-questions appear to the participant.
- If you choose to randomize but want one specific question to always appear first, you can anchor that question by checking the corresponding box under the Anchor column.
- Just like the rating questions above, click Save & Add Question to save your question as part of the Jump Sequence block and proceed to add another nested question. Click Save & Close Jump Block to save your question as part of the Jump Sequence block and finalize it with this as the last question. Or click Cancel to stop the question building process all together.